How to Pick the Right Spot to Anchor
The following is an excerpt from the Anchoring a Sailboat Online Course
It was surprising to us a little at first that anchoring a sailboat is feared by many. But after I drank some memory juice, I remembered back to the first few times anchoring and losing sleep over whether the anchor would hold or not (I still do lose a little sleep at anchor. And rightly so, although now not through fear but rather through prudence).
This discussion is about selecting an anchoring spot. It is particularly pertinent for when on a bareboat charter in a place where you have never been before and you’re just going by the information on the chart.
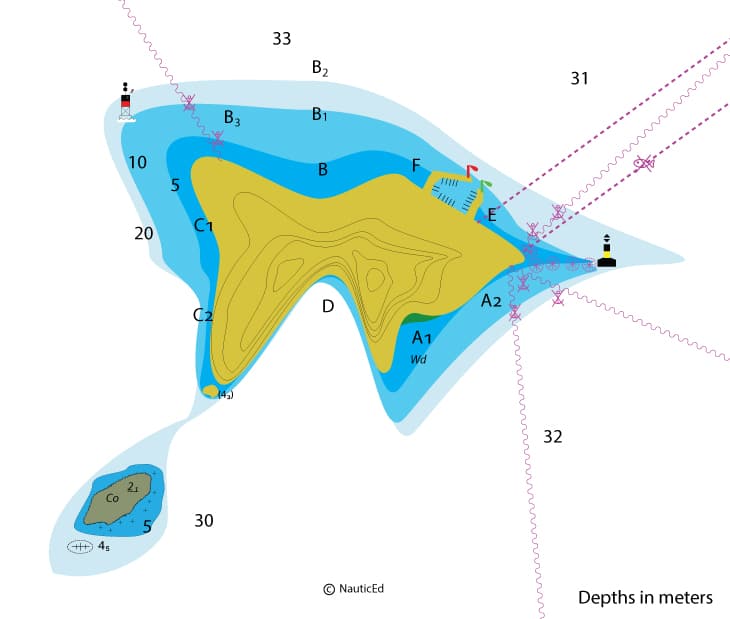
So, below is a chart of a semi-typical island that we’ve made up (don’t go looking for this one anywhere, it does not exist).
The island has a particular shape that lends itself to some potential anchoring spots. Let’s investigate.
The spot that you select is dependent on many factors which you need to take into account
- No-anchoring areas
- Depth
- Surrounding obstacles
- Tide range (tide height at time of anchoring)
- Seafloor type
- Shelter from wind
- Shelter from waves
The first thing you need to take note of on a chart is whether there are any areas where you are prohibited from anchoring. Usually, there is a good reason for not being allowed to anchor there. The squiggly lines on a chart are undersea communication lines. Don’t anchor on these. You will usually see a “no anchoring” icon there. Thus A2 is not out of the question but you should drop further on the south side of the A2 label. Recently, the entire archipelago of Tonga lost communications because of a ships badly placed anchor.
Depth is always a major consideration. You can’t anchor in too deep of water. You must use the appropriate scope for your anchor rode. Scope refers to the ratio of anchor rode paid out to the depth.
Rode is the vernacular term for the rope and or chain that attaches the boat to the anchor. Sometimes it is all chain and sometimes it is a combo of chain and rope.
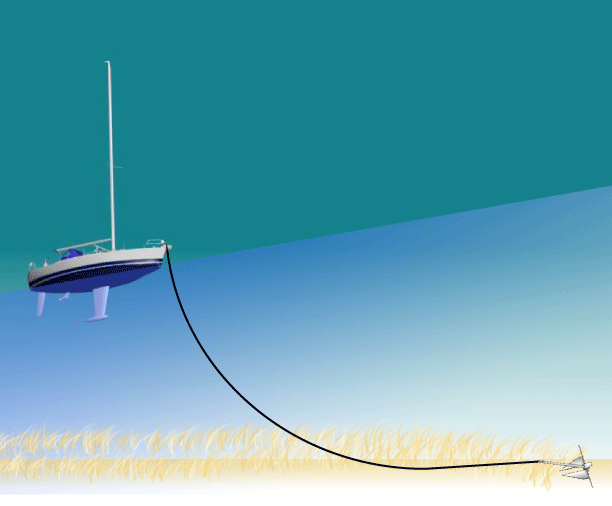
Since chain is heavier than rope, if you have an all-chain anchor rode you can let out less rode than if it is made up of chain and rope. The trick is that you have to have enough out so that even during a gust, the anchor itself is being pulled horizontally across the bottom. Dangling an anchor on the bottom is never going to hold. See this pic below.
1st, estimate the depth of water where your anchor will lie at the highest tide point of your stay, then make a decision about the length of rode to let out.
- For chain rode, use 50 ft (15 m) plus 2 times the depth
- For Chain and Rope combination rode, use 50 ft (15 m) plus 4 times the depth.
Take a look a position D on the chart above; the depth is at least 30 meters (100 ft) deep at low tide. With chain rode, you would need to let out 75 meters (250 ft) if there was no tide change. Or if there is a 2-meter tide range then add another 4 meters to the amount required. Most boats don’t carry that much. Typically they carry about 50-60 meters of chain, which limits your maximum depth at high tide for anchoring at about 15-25 meters (50 – 80 ft). So position D is pretty much out.
Surrounding obstacles can be rocks, shallow areas, or even the beach area. The danger is calculated by knowing how much anchor rode is let out and then allowing for a full 360 degrees swing in the night. So for example, if you have 60 m (200 feet) of rode out then your anchor had better be more than 60 m away from any area in every direction that is shallow enough at low tide whereby your keel might hit, including the land or submerged rocks. So even if you think you could tuck in enough on area D to get to the shallow area, you are still too close to land to allow for any swing in the night. In area A1, there is a drying area of land at low tide. This means when you anchor you need to stay far enough out to not hit the bottom. Area C2 is also a concern, it is doubtful you could anchor in shallow enough water and not swing into the land. If there is a steady easterly (out of the east) wind predicted you might argue that C2 could be done since swing is unlikely. However, if you observe the rate that the bottom drops off, if the anchor drags a little, it will move into deep water quite fast which reduces your holding power and thus may allow you to completely drift off anchor. Also, view the contour lines on land. If there is a steep cliff there, even a steady easterly wind can create some swirling of wind. C2 is just not a great idea.
Tide range affects your scope as the tide rises and drops. A rising tide increases the depth and thus to anchor with proper scope, you must allow for the maximum depth the water will get to. e.g. if you anchor in 5 meters (16 ft) of water at low tide and the tide range is 3 meters (10 ft), then you must consider the depth to be 8 meters which gives rise to 39 meters of chain (120 ft). A lowering tide makes the water more shallow and thus your swing distance is increased. e.g. if you anchor in 5 m of water at high tide and the tide range is 3 meters then there will only be 2 meters (6 ft) under your keel (make sure you know the zero datum point of your depth sounder – hopefully it is set to be the bottom of the keel – or in this case if the zero datum was at water level you could be grounding at low tide). Assuming you know the datum is at the bottom of the keel and you let out 40 meters of chain to begin with, you’d better make sure that there is plenty of depth within 40 meters in all directions. Considering you’re already at 2, this is doubtful.
The seafloor type is a critical factor. Certain anchors hold better in certain bottom types. Look on the chart to find out the seafloor type where you are anchoring. At position A1, the seafloor is weed. Danforth anchors don’t do well in weed for example. It is always a good idea to know your anchor type and know what bottom types it works best with and what bottom types it works worst with. Plan on ( if practical) to dive the anchor with a snorkel to make sure it is dug in well.
Being sheltered from the wind provides for two things; one, general comfort and two, it reduces the force exerted on the anchor. Wind gusts can exert an enormous amount of force on the anchor and cause it to drag or worse yet – to pull out completely. As examples, the below lists which anchor spots might be best with varying wind directions (wind direction is always announced as where it comes from – Easterly wind comes from the east).
- Northerly: A1, A2
- Southerly: E, F, B, B1, and possibly B3 (B3 better for SE direction)
- Easterly: C1 and possibly F in behind the marina
- Westerly: E, A1, A2
Of course, the Marina is always a safe choice. But $$$.
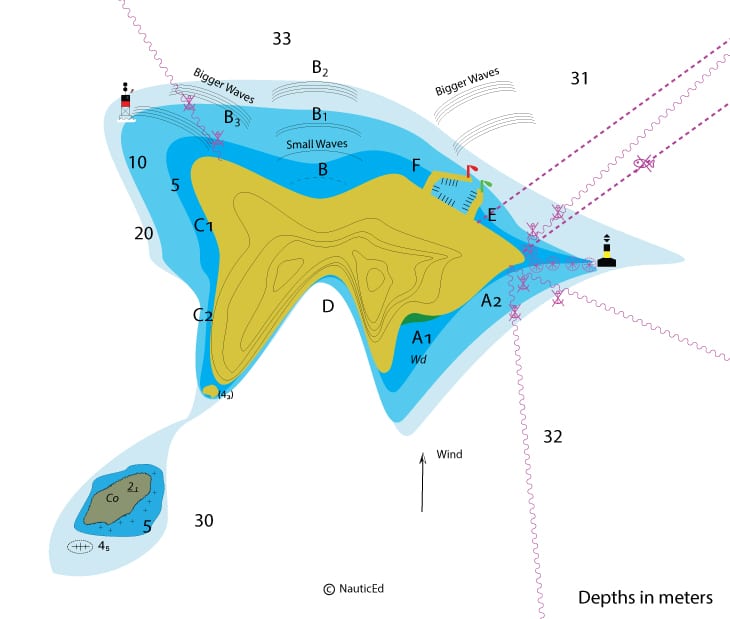
Waves are the sworn enemy of anchors. They shock load the anchor and drag it a little with each wave. The further from the protection of land the greater the size of waves. Waves also are annoying in that they change direction as they pass by a land mass. Below we show these phenomena.
A southerly wind causes waves which will wrap around the island as such. So while you might think, as you are making your plan, that B3 might be good, you’ll probably get nailed by waves. With southerly higher winds, as you anchor further out to the north of the island, to say position B1, you might start to experience bigger and more undesirable waves.
It is also a good idea to watch wave prediction models and wind prediction models for your stay. Windguru is a great website which shows good prediction models for waves height and direction and wind strength and direction.
As you make your plan, take note of anything extra on the chart. On the northwest of this island, there is an isolated danger mark. At the southwest, there is a very dangerous reef that drys and un-dries so it could be submerged as you approach. On the east side, the cardinal mark tells you to stay to the east of the mark as there are dangerous rocks of unknown depth.
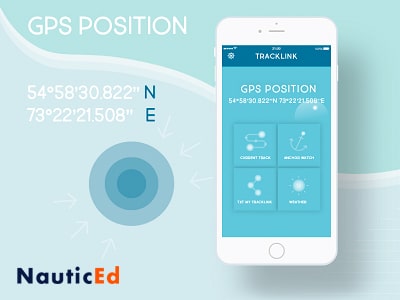
Anchor Drift Alarm: And, as I alluded to in the opening paragraph – set a timer in the night and get up to check around. There are some good anchor alarms out there – the best is embedded into the TrackLink App. You do need internet access when anchoring so that it can load the map of the area. When you anchor in a bay you can just draw a circle around your boat with your finger on the map. If your boat drifts out of the circle, the alarm goes off. Simple!
We hope this article helped raise your awareness and things to think about when picking you anchoring spot. And you can see how critical this type of knowledge is. This tip is one of over a thousand tips and tricks and “must know hows” if you are to be a responsible and safe skipper leading your friends and family.
Take NauticEd courses and gain the proper knowledge. All courses are yours for life after a one time purchase. You get free access to upgrades when we make them. You can take the test as many times as you like. The system remembers where you last left off in the course so you can come back to the same page or the same place in the test at any time if the future.
Get started now with two FREE SAILING COURSES – Basic Sail Trim and Navigation Rules. Then when you’re confident that we are incredibly awesome, select from our Skipper Small Keelboat, Skipper large Keelboat, Bareboat Charter Master, or Captain bundles of courses or just take any course al la carte – your choice.
NauticEd is a United States Coast Guard recognized sailing education company. All yacht charter companies worldwide recognize NauticEd sailing certifications. The NauticEd SLC sailing license is accepted by all Mediterranean countries and yacht charter companies.
NauticEd – 21st Century Sailing Education!
Take the NauticEd online Anchoring a Sailboat course
- RYA Day Skipper with NauticEd - April 1, 2024
- NauticEd uses the SailTies GPS Tracking App - March 29, 2024
- Sea of Cortez Flotilla – February 2025 - March 8, 2024

